

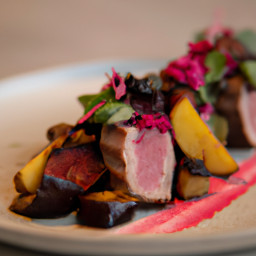
- 4 whole quails, patted dry
- 25–30 g dried porcini mushrooms
- 6–8 dried apricots (or fresh if available) for compote
- 1 small shallot, minced
- 1 clove garlic, minced
- 50 ml brandy or Madeira (optional)
- 150 ml chicken stock
- 100 ml double cream (heavy cream)
- 2 tbsp unsalted butter
- 1 tbsp olive oil
- 1 tsp sugar (for compote)
- 1 tbsp lemon juice (for compote)
- Salt and freshly ground black pepper
- Fresh thyme sprigs
1. Make the apricot compote: chop apricots and simmer with 2–3 tbsp water, sugar and lemon juice over low heat until softened and slightly jammy, about 8–10 minutes. Set aside and keep warm.
2. Rehydrate porcini in 100–150 ml hot water for 15–20 minutes; drain and reserve liquid. Chop mushrooms.
3. Season quails with salt and pepper. Heat oil and 1 tbsp butter in a heavy skillet over medium‑high heat. Sear quails breast‑side down until golden, 3–4 minutes, then turn and brown all over. Reduce heat and cook 6–8 more minutes (or finish in a 180°C/350°F oven 6–8 minutes) until done.
4. Remove quails to rest on a warm plate. In the same pan, add shallot and garlic and sauté until translucent.
5. Add chopped porcini, deglaze with brandy (careful with flames) or a splash of stock, then add chicken stock and 2–3 tbsp reserved porcini liquid. Simmer to reduce slightly.
6. Stir in cream and simmer until sauce coats the back of a spoon; whisk in remaining butter, adjust seasoning and add a sprig of thyme.
7. To serve: spoon porcini cream sauce on plates, place quail on top and add a spoonful of apricot compote alongside for contrast.

- 4 veal chops (about 6–8 oz each), trimmed
- 4 thin slices prosciutto
- 4–8 fresh sage leaves (1–2 per chop)
- Salt and freshly ground black pepper
- 2 tbsp olive oil
- 2 tbsp unsalted butter
- 1/2 cup dry white wine
- 1/2 cup chicken or veal stock
- Lemon wedges, optional
1. Lightly season both sides of the veal chops with salt and pepper. If chops are thick, pound gently to an even thickness (about 1/2 inch).
2. Place 1–2 sage leaves on each chop, then lay a slice of prosciutto over the sage; secure with a toothpick if needed.
3. Heat olive oil and 1 tbsp butter in a large skillet over medium-high heat until shimmering.
4. Add chops, prosciutto-side down first, and sear 3–4 minutes per side until golden and just cooked through. Remove chops to a warm plate and tent with foil.
5. Reduce heat to medium, add white wine to deglaze the pan, scraping up browned bits. Let wine reduce by half (about 2 minutes).
6. Add stock and simmer 2–3 minutes until slightly reduced. Whisk in remaining butter off the heat for a glossy sauce.
7. Return chops to the pan briefly to heat through and coat with sauce. Remove toothpicks, serve with sauce spooned over and lemon wedges if desired.

---

- 4 veal chops (6–8 oz each)
- Salt and freshly ground black pepper
- 1/2 cup all-purpose flour, for dredging
- 2 tbsp olive oil
- 2 tbsp unsalted butter
- 8 oz mushrooms (cremini or button), sliced
- 1 shallot, finely chopped (or 1 small onion)
- 2 garlic cloves, minced
- 3/4 cup Marsala wine
- 3/4 cup chicken or veal stock
- 1–2 tsp fresh thyme leaves or chopped parsley
1. Pat chops dry and season with salt and pepper. Lightly dredge in flour, shaking off excess.
2. Heat oil and 1 tbsp butter in a large skillet over medium-high heat. Sear chops 3–4 minutes per side until golden; transfer to a plate and keep warm.
3. Add remaining butter to the pan, reduce heat to medium, and sauté shallot until soft, about 2 minutes. Add mushrooms and cook until they release liquid and begin to brown, about 5 minutes.
4. Stir in garlic and cook 30 seconds. Pour in Marsala wine to deglaze, scraping up browned bits; let reduce by half.
5. Add stock and simmer until sauce thickens slightly (2–4 minutes). Taste and adjust seasoning.
6. Return chops to the pan for a minute or two to reheat and mingle with the sauce. Sprinkle with thyme or parsley and serve.

---

- 4 veal chops (6–8 oz each)
- Salt and freshly ground black pepper
- 2 tbsp olive oil
- 2 tbsp unsalted butter
- 1/2 lb asparagus, trimmed and cut into tips
- 6 oz lump crabmeat, picked over for shells
- Lemon wedges

Hollandaise (classic or blender method)
- 3 egg yolks (or use pasteurized yolks)
- 6 tbsp unsalted butter, melted and hot
- 1 tbsp lemon juice
- Salt and cayenne or white pepper to taste
1. Preheat oven to 375°F (190°C). Season veal chops with salt and pepper.
2. Heat oil and 1 tbsp butter in an ovenproof skillet over medium-high heat. Sear chops 2–3 minutes per side until golden. Transfer skillet to oven and roast 5–8 minutes until internal temperature reaches desired doneness (veal is best at medium-rare to medium). Remove chops and keep warm.
3. While chops roast, blanch asparagus tips in boiling salted water 1–2 minutes until bright green and tender-crisp; shock in ice water, then drain.
4. Gently warm crabmeat in a small pan with a squeeze of lemon and a pat of butter, keeping lumps intact.
5. Make hollandaise: in a heatproof bowl whisk egg yolks and lemon juice until thickened. Place over gently simmering water (double boiler) and whisk while slowly drizzling in hot melted butter until sauce is thick and smooth; season with salt and a pinch of cayenne. (Or use a blender hollandaise: blend yolks and lemon, slowly pour in hot butter while blender runs until emulsified.)
6. To serve, place a chop on each plate, top with asparagus tips and a spoonful of crabmeat, and finish with a generous spoonful of hollandaise. Serve immediately with lemon wedges.

- 1 lb walleye fillets (skinless or skin-on, patted dry)
- 3/4 cup all-purpose flour
- 1 tsp salt
- 1/2 tsp black pepper
- 1/2 tsp paprika (optional)
- 2–3 tbsp vegetable oil
- 2 tbsp butter
- Lemon wedges, for serving
- Fresh parsley, chopped (optional)
1. Mix flour, salt, pepper, and paprika on a plate. Dredge fillets lightly in the seasoned flour, shaking off excess.
2. Heat oil in a large skillet over medium-high heat until shimmering. Add butter and let it foam.
3. Add fillets, cook 3–4 minutes per side (depending on thickness) until golden and the fish flakes easily with a fork.
4. Transfer to a plate, squeeze lemon over the fillets and sprinkle with parsley. Serve immediately.

---

- 1 lb walleye fillets
- Salt and pepper, to taste
- 1/2 cup all-purpose flour (for dredging)
- 3 tbsp butter
- 2 tbsp olive oil
- 1/3 cup sliced almonds
- 1 tbsp fresh lemon juice
- 1 tbsp fresh parsley, chopped
1. Season fillets with salt and pepper and dredge lightly in flour.
2. In a skillet, heat olive oil over medium heat. Add fillets and cook 3–4 minutes per side until cooked through and lightly browned. Remove and keep warm.
3. In the same skillet, reduce heat to medium-low and add butter. When butter starts to brown and smell nutty, add sliced almonds and toast until golden (about 1–2 minutes).
4. Remove from heat, stir in lemon juice and parsley, then spoon the almond-butter sauce over the fillets. Serve at once.

---

- 1 lb walleye fillets, cut into portions
- 1 cup all-purpose flour, plus extra for dusting
- 1 tsp baking powder
- 1/2 tsp salt
- 1 cup cold beer (lager or ale)
- Vegetable oil for deep frying (enough for 2–3 inches in a pot)
- Lemon wedges and tartar sauce, for serving
1. Whisk 1 cup flour, baking powder and salt in a bowl. Gradually whisk in cold beer until a smooth batter forms; chill briefly while heating oil.
2. Heat oil in a deep pot to 350–375°F (175–190°C). Pat fish dry and dust lightly with flour.
3. Dip each piece into batter, let excess drip off, then carefully lower into hot oil. Fry in batches 3–5 minutes until golden and cooked through.
4. Remove to a wire rack or paper towels to drain. Serve hot with lemon and tartar sauce.

---
- 1 lb walleye fillets
- 2 tbsp butter, melted
- 2 tbsp olive oil
- 2 cloves garlic, minced
- 1 tbsp fresh lemon juice
- Zest of 1 lemon
- 1 tbsp fresh parsley, chopped
- Salt and pepper, to taste
- Optional: 1/4 cup panko breadcrumbs for a light crust
1. Preheat oven to 400°F (200°C). Pat fillets dry and place in a lightly greased baking dish.
2. Whisk melted butter, olive oil, garlic, lemon juice, lemon zest, parsley, salt and pepper. If using, sprinkle panko over fillets first, then drizzle the butter-herb mixture evenly.
3. Bake 10–12 minutes (depending on thickness) until fish is opaque and flakes easily. Finish under broiler 1–2 minutes if you want extra browning.
4. Serve with extra lemon wedges.

---

- 1 lb walleye fillets, cut into 1-inch pieces
- 4 slices bacon, chopped
- 1 medium onion, diced
- 2 stalks celery, diced
- 2 cloves garlic, minced
- 2 medium potatoes, peeled and diced (about 2 cups)
- 3 cups fish or chicken broth
- 1 cup corn kernels (fresh or frozen)
- 1 cup heavy cream or half-and-half
- Salt and pepper, to taste
- 1 tbsp fresh parsley, chopped
1. In a large pot, cook bacon over medium heat until crisp. Remove bacon with a slotted spoon, leaving drippings.
2. Add onion and celery to the pot and sauté until softened, about 5 minutes. Stir in garlic and cook 30 seconds.
3. Add potatoes and broth. Bring to a simmer and cook until potatoes are tender, about 10–12 minutes.
4. Stir in corn and cream, then add walleye pieces. Simmer gently 4–6 minutes until fish is opaque and flakes. Do not boil vigorously.
5. Season with salt and pepper, stir in reserved bacon and parsley. Serve hot with crusty bread.

- 1 kg pork belly, skin removed or left on and scored, cut into 2–3 cm cubes
- 2 tbsp vegetable oil
- 3 tbsp rock sugar or brown sugar
- 4 cloves garlic, smashed
- 3 slices fresh ginger
- 3 scallions, cut into 5 cm pieces
- 2 star anise
- 1 small cinnamon stick
- 3 tbsp Shaoxing wine (or dry sherry)
- 3 tbsp light soy sauce
- 1 tbsp dark soy sauce (for color)
- 300–400 ml water or enough to barely cover the pork
- Optional: 4 hard-boiled eggs, peeled
1. Step 1: Blanch the pork cubes in boiling water 3–4 minutes to remove impurities, then drain and set aside.
2. Step 2: In a heavy pot or wok, heat oil over medium heat. Add the sugar and stir until it melts and caramelizes to a deep amber.
3. Step 3: Add the pork to the caramel and sear briefly to coat pieces in the syrup.
4. Step 4: Add garlic, ginger, scallions, star anise, cinnamon, Shaoxing wine, light soy, dark soy and enough water to almost cover the pork.
5. Step 5: Bring to a simmer, cover partially, and braise gently for 1–1.5 hours until pork is very tender, turning occasionally.
6. Step 6: If using, add peeled boiled eggs in the last 20 minutes to absorb flavor. Uncover and reduce sauce over medium-high heat until glossy and thickened to your liking.
7. Step 7: Adjust seasoning with a little sugar or soy as needed. Serve hot with steamed rice.

---

- 800 g pork belly, cut into large cubes (about 4–6 cm)
- 1 thumb-size piece ginger, sliced
- 2 scallions, tied into a knot
- 1/2 cup sake
- 1/4 cup mirin
- 1/3 cup soy sauce
- 2 tbsp sugar
- 2 cups water (or enough to cover)
- Optional: 2 boiled eggs, peeled; Japanese karashi mustard for serving
1. Step 1: Parboil the pork cubes in boiling water for 5 minutes, then drain and rinse to remove scum.
2. Step 2: In a pot, combine pork, ginger, scallion knot, sake, mirin, soy sauce, sugar and water; bring to a gentle simmer.
3. Step 3: Skim any foam, then cover and simmer very gently for 1.5–2 hours until the pork is tender and nearly falling apart.
4. Step 4: If using eggs, add them in the last 20–30 minutes so they take on color and flavor.
5. Step 5: Remove pork and eggs, then reduce the braising liquid over higher heat to a glaze. Return pork to the glaze briefly to coat.
6. Step 6: Slice or cube the pork, serve with mustard, steamed rice and pickles.

---
- 600 g pork belly, thinly sliced (about 3–5 mm)
- Salt and freshly ground black pepper
- 2 tbsp sesame oil
- 1/2 tsp coarse salt
- Ssamjang (Korean dipping paste)
- Fresh lettuce leaves and perilla leaves
- Sliced garlic, green chilies, and kimchi for serving
- Optional: cooked rice for wraps
1. Step 1: Preheat a grill pan or skillet over high heat until smoking hot. Pat pork slices dry.
2. Step 2: Place pork slices on the hot surface in a single layer and cook without moving for 1–2 minutes to get a good sear.
3. Step 3: Flip and cook the other side until edges are browned and some pieces are crisp — another 1–2 minutes.
4. Step 4: Season lightly with salt and pepper while hot, or dip quickly in sesame oil mixed with coarse salt.
5. Step 5: To eat, place a piece of pork on a lettuce leaf, add a dab of ssamjang, a slice of garlic, chili and kimchi, wrap and eat in one bite.

---

- 1–1.5 kg pork belly, skin on
- 8 cups water (enough to cover)
- 4 cloves garlic, smashed
- 2 bay leaves
- 1 tbsp whole peppercorns
- 1 tbsp salt (for boiling) plus more for finishing
- Vegetable oil for deep-frying
- For sawsawan (dipping sauce): 1/4 cup soy sauce, 1/4 cup vinegar, 1 clove minced garlic, chopped chili (to taste)
1. Step 1: Place pork belly in a pot with water, garlic, bay leaves, peppercorns and salt; bring to a boil, then simmer uncovered for 45–60 minutes until tender but not falling apart.
2. Step 2: Remove pork and allow to cool. Pat very dry with paper towels; refrigerate uncovered for at least 30 minutes to dry the skin (helps crisping).
3. Step 3: Heat enough oil in a deep pot or wok to fully submerge the pork to 180°C (350°F). Carefully lower the pork and fry until the skin is blistered and crisp, turning as needed, about 8–12 minutes.
4. Step 4: Remove and drain on a rack. Sprinkle with salt while hot. Let rest 10 minutes.
5. Step 5: Chop into bite-size pieces and serve with sawsawan (mix soy, vinegar, garlic, chili) and steamed rice.

---

- 1.5–2 kg boneless pork belly (skin on), trimmed
- 500 g boneless pork loin (optional) to place inside for a joint
- 6 cloves garlic, minced
- 2 tbsp fennel seeds, toasted and crushed
- 2 tbsp fresh rosemary, chopped
- 2 tbsp fresh thyme leaves
- Zest of 1 lemon
- 2 tsp crushed red pepper flakes (optional)
- 2–3 tbsp olive oil
- 2 tbsp sea salt
- 1 tsp black pepper
- Kitchen twine
1. Step 1: Lay pork belly skin-side down. If using loin, place it in the center. Mix garlic, fennel, herbs, lemon zest, olive oil, salt and pepper into a paste and spread over meat.
2. Step 2: Roll the belly tightly around the loin (or itself) into a log, keeping the skin as smooth as possible. Tie securely with kitchen twine at 2–3 cm intervals.
3. Step 3: Score the skin lightly (optional) and rub with a little extra salt and olive oil. Let sit uncovered in the refrigerator for a few hours or overnight for drier skin and better crisping.
4. Step 4: Preheat oven to 230°C (450°F). Roast the porchetta on a rack for 30–40 minutes to crisp the skin.
5. Step 5: Reduce heat to 160°C (325°F) and continue roasting for another 1.5–2 hours until internal temperature reaches about 70–75°C (160–165°F) and meat is tender.
6. Step 6: Rest 15–20 minutes, then remove twine and slice into rounds. Serve with roasted potatoes or a simple salad.

- 1 hanger steak (about 1.5 lbs)
- Salt and freshly ground black pepper, to taste
- 2 tablespoons olive oil
- 2 cloves garlic, minced
- 1 tablespoon butter
- 1 lb russet potatoes, cut into fries
- Oil for frying
- Fresh parsley, chopped (for garnish)
1. **Prepare the Steak**: Season the hanger steak generously with salt and freshly ground black pepper. Let it sit at room temperature for about 15-20 minutes.
2. **Cook the Steak**: Heat a large skillet over medium-high heat and add olive oil. Place the steak in the skillet and sear for about 4-5 minutes on each side, or until the desired doneness is reached. Remove from skillet, top with butter and minced garlic, and let it rest for at least 5 minutes before slicing.
3. **Prepare the Fries**: While the steak is resting, heat oil in a deep fryer or a deep skillet to 375°F (190°C). Fry the potato slices in batches until golden brown and crispy, about 5-7 minutes per batch. Drain on paper towels and season with salt.
4. **Serve**: Slice the hanger steak against the grain and serve alongside the fries. Garnish with chopped fresh parsley and enjoy!

---

- 1 hanger steak (about 1.5 lbs)
- Salt and freshly ground black pepper, to taste
- 2 tablespoons olive oil

For Chimichurri Sauce:
- 1 cup fresh parsley, finely chopped
- 1/4 cup fresh cilantro, finely chopped
- 4 cloves garlic, minced
- 1/2 cup olive oil
- 1/4 cup red wine vinegar
- 1 teaspoon dried oregano
- 1/2 teaspoon red pepper flakes
- Salt and freshly ground black pepper, to taste
1. **Prepare Chimichurri**: In a bowl, combine parsley, cilantro, garlic, olive oil, red wine vinegar, oregano, red pepper flakes, salt, and freshly ground black pepper. Mix well and set aside to let the flavors meld.
2. **Season the Steak**: Season the hanger steak on both sides with salt and freshly ground black pepper. Preheat the grill to medium-high heat.
3. **Grill the Steak**: Brush the grill with olive oil and place the steak on the grill. Cook for about 4-5 minutes per side for medium-rare, or until desired doneness. Remove from grill and let rest for 5 minutes.
4. **Serve**: Slice the hanger steak against the grain and serve with generous spoonfuls of chimichurri sauce on top. Enjoy with your favorite side dishes or bread.

- 1 whole chicken (about 3-4 lbs)
- 10 cups water
- 2 onions, quartered
- 3 carrots, peeled and sliced
- 3 celery stalks, sliced
- 3 garlic cloves, smashed
- 2 bay leaves
- Salt
- Black pepper
- Fresh parsley, chopped (for garnish)
1. **Prepare the Stock:** In a large pot, combine the whole chicken with the water, bringing to a boil over medium-high heat. Skim off any foam that rises to the top.
2. **Add Vegetables and Spices:** Add the onions, carrots, celery, garlic, and bay leaves to the pot. Season with salt and black pepper.
3. **Simmer:** Reduce the heat to low, cover the pot partially, and simmer for about 1.5 to 2 hours, or until the chicken is cooked through and is falling off the bone.
4. **Remove Chicken:** Carefully remove the chicken from the pot. Let it cool slightly, then shred the meat into bite-sized pieces. Discard the skin and bones.
5. **Strain the Soup:** Strain the soup through a fine-mesh sieve into another pot or container. Discard the solids.
6. **Return Chicken to Soup:** Add the shredded chicken back into the strained broth.
7. **Taste and Adjust Seasoning:** Taste the soup and adjust the seasoning with more salt and pepper if needed.
8. **Serve:** Ladle the soup into bowls, garnish with fresh parsley, and serve hot. Enjoy your comforting chicken soup!

Whole duck, 2–2.5 kg (4.5–5.5 lb) (or 1 pre-roasted Peking duck as shortcut)
1 tbsp kosher salt
1 tsp Chinese five-spice powder
2 tbsp Shaoxing wine (or dry sherry)
4 cups water (for blanching and basting)
3 tbsp maltose or honey (for glaze; if using maltose, dissolve in warm water)
2 tbsp light soy sauce (for glaze)
1 tsp sesame oil (for glaze)
2 tbsp vegetable oil (for roasting rack or to rub before roasting)

For the pancakes (makes ~12–14):
2 cups (250 g) all-purpose flour
3/4 cup (180 ml) boiling water
1–2 tbsp cold water if needed
1 tbsp toasted sesame oil (for brushing/pulling layers)

Condiments & garnishes:
6–8 tbsp hoisin sauce (or sweet bean sauce)
1 large cucumber, julienned into thin matchsticks
4–6 scallions (spring onions), julienned on the bias
Optional: sugar or rice vinegar to taste for a quick dipping sauce
Overview: This recipe shows a home oven method to get crisp skin and tender meat, plus a shortcut using store-bought roast duck. Plan ahead: duck skin benefits from drying (4 hours–overnight). Total active time: ~1.5–2 hours (plus drying & roasting time). Serves 4–6.
Prep the duck: Remove giblets, pat the duck thoroughly dry inside and out. Trim excess fat around cavity. Prick the skin lightly all over the fattier areas with a skewer or fork—don’t pierce the meat—this helps fat render during roasting.
Season the cavity: Rub the inside of the cavity with Shaoxing wine and a light pinch of salt. Add a few slices of ginger and a halved scallion into the cavity if you like extra aroma (optional).
Tighten and dry the skin: Rub 1 tbsp salt and 1 tsp Chinese five-spice evenly over the skin (sparing the cavity). For best results, hang the duck in the fridge uncovered for at least 4 hours or overnight to dry the skin. If you can’t hang it, place on a rack in the fridge uncovered with a fan directed at it for a few hours.
Blanch the skin (traditional step to tighten skin): Bring 4 cups water to a boil. Carefully pour the boiling water evenly over the entire duck (or hold duck above pot and ladle). This tightens the skin and helps crisping. Pat dry thoroughly and let cool.
Make the glaze: In a small bowl combine 3 tbsp maltose (or honey) dissolved in 2 tbsp warm water, 2 tbsp light soy sauce and 1 tsp sesame oil. Stir to a smooth glaze.
Glue on the glaze: Brush the glaze evenly over the duck skin. If you have time, let sit 15–30 minutes and brush one more thin coat. The glaze helps brown and crisp the skin.
Roasting — oven method (if using raw duck): Preheat oven to 230°C (450°F). Place the duck breast-side up on a rack set in a roasting pan (use a drip tray underneath). Roast at 230°C (450°F) for 15–20 minutes to jump-start browning and crisping.
Lower heat and continue: Reduce oven temperature to 180°C (350°F) and roast for another 40–60 minutes, depending on duck size, until the skin is deep golden and an instant-read thermometer in the thickest part of the thigh reads at least 74°C (165°F). If the skin is browning too quickly, tent loosely with foil. Periodically spoon off excess fat from the pan if it accumulates.
Crisp finish: For extra crispness, increase oven to 230°C (450°F) for the last 10 minutes or set to broil for 2–4 minutes—watch constantly to avoid burning.
Rest the duck: Remove duck from oven and let rest 10–15 minutes before slicing. Resting lets juices redistribute and makes slicing easier.
Shortcut (using pre-roasted Peking duck): If using a store-bought roast duck, separate skin and meat if available, or re-crisp whole bird: preheat oven to 220°C (425°F) and roast whole or skin-side-up on a rack for 8–12 minutes until skin crisps. Let rest 5–10 minutes before slicing.
Debone & slice: Carve thin slices of skin and meat. Traditional presentation separates crispy skin and meat thinly sliced or shredded; for pancakes, slice thin strips roughly 2–3 mm thick. Keep juices for a light drizzle if desired.
Make the pancakes (Chinese steamed/pan pancakes):
  1) Dough: In a bowl put 2 cups flour. Pour 3/4 cup boiling water over the flour while stirring with chopstick or fork until shaggy. When cool enough, knead into a smooth dough for about 4–5 minutes. If dough is dry, add 1–2 tbsp cold water. Cover with plastic and rest 30 minutes.
  2) Forming layered pancakes (gives pliable, slightly layered pancakes): Divide dough into 12–14 equal pieces. Roll each piece into a ball. On lightly floured surface, roll one ball into a thin circle about 12–14 cm (5–6 in). Brush a thin layer of sesame oil over surface, then roll the circle into a tight log. Coil the log into a spiral, flatten with palm, then roll out again into a thin 12–14 cm circle. Repeat for remaining dough.
  3) Cook pancakes: Heat a dry nonstick skillet over medium-high heat. Cook each pancake 30–45 seconds per side until pale golden with a few brown spots (no oil required). Stack cooked pancakes and keep wrapped in a clean towel or in a covered container to stay soft and pliable.
Prepare garnishes & sauce: Julienne cucumber and scallions. Warm hoisin sauce slightly (microwave 10–15 seconds) so it spreads easily. Optional quick dipping sauce: mix 2 tbsp hoisin with 1 tsp rice vinegar and a pinch of sugar.
Assemble: Place a warm pancake on a plate. Spread 1 tsp hoisin (or to taste) in center. Add 2–3 slices of duck (skin and meat), a few cucumber sticks and scallion strips. Fold or roll and eat immediately.
Serving suggestions: Serve plates of duck, pancakes and garnishes family-style so guests assemble. Offer small bowls of extra hoisin and a side of plum sauce if desired.
Storage & reheating: Leftover pancakes keep wrapped in refrigerator 2–3 days (reheat gently in skillet or steam to soften). Store duck meat separate from skin if possible: reheat meat in covered oven at 160°C (325°F) until warm; re-crisp skin under broiler 1–3 minutes while watching carefully.
Notes & tips: Use maltose if you want a more authentic lacquered crust, honey works well as substitute. Air-drying the skin is the most important step for crispness. If short on time, use a pre-roasted duck and focus on reheating/crisping skin and making fresh pancakes and garnishes.
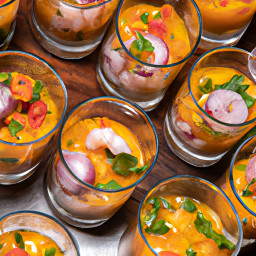
400 g (14 oz) firm white fish (corvina, reineta, sea bass, or other sushi-grade) — skinless, boned, cut into 1/2-inch / 1 cm cubes
200 g (7 oz) cooked shrimp, peeled and halved (optional)
240 ml (1 cup) fresh lime juice (about 8–10 limes)
30 ml (2 tbsp) fresh orange juice (or citrus blend)
1 small red onion, very thinly sliced and rinsed (about 3/4 cup)
1 medium tomato, seeded and small-diced (about 1 cup)
1 small cucumber, peeled, seeded and small-diced (about 1/2 cup)
1–2 ají verde or jalapeño chilies, seeded and finely minced (adjust to heat preference)
1/2 cup fresh cilantro leaves, roughly chopped
1 tbsp extra-virgin olive oil
1 tsp kosher salt, plus more to taste
1/4 tsp freshly ground black pepper
1 tsp granulated sugar or honey (optional, to balance acidity)
1 ripe avocado, mashed with a squeeze of lime and pinch of salt (for base layer)
8–12 shooter glasses (about 2 oz / 60 ml each) or small tasting cups
Garnishes: cancha or toasted corn nuts (or crushed tortilla chips), extra cilantro sprigs, thin lime wedges or microgreens
Safety & prep note: Use the freshest, sushi- or sashimi-grade fish available when serving ceviche. Acid “cures” fish but does not eliminate all pathogens; consume promptly.
Cut the fish into uniform 1/2-inch (1 cm) cubes and place in a nonreactive bowl. If using shrimp, add it now.
Pour the lime juice and orange juice over the seafood so pieces are well covered. Add 1/2 teaspoon salt and gently stir to combine.
Cover and refrigerate to cure: for 1/2-inch cubes, cure 10–15 minutes until the fish is opaque and slightly firm. For larger pieces, increase time up to 30 minutes. Do not over-cure — the fish should remain tender.
While the seafood cures, prepare the vegetables: rinse the thinly sliced red onion under cold water for 30–60 seconds to mellow its bite, then drain and pat dry.
In a mixing bowl combine the diced tomato, diced cucumber, minced ají or jalapeño, chopped cilantro, olive oil, remaining 1/2 teaspoon salt, black pepper and the optional 1 teaspoon sugar or honey. Stir to mix.
When the seafood has reached the desired texture, drain off about half of the curing juices (reserve a little to adjust texture if needed). Add the seafood and the rinsed onion to the vegetable mix. Gently toss to combine and taste — adjust salt, pepper or a touch more lime if needed. Chill briefly if desired, but assembly works best when ceviche is cool, not ice-cold.
Prepare the shooter glasses: spoon about 1 teaspoon (or more to taste) of mashed avocado into the bottom of each glass to form a creamy base.
Spoon the ceviche mixture into each shooter glass over the avocado, filling to just below the rim.
Garnish each shooter with a sprinkle of cancha or crushed tortilla chip for crunch, a small cilantro sprig, and a thin lime wedge or microgreen. For color, you can also add a tiny curl of red bell pepper or a sliver of ají.
Serve immediately. Ceviche shooters are best enjoyed within 30–60 minutes of assembly; keep refrigerated until serving and discard any leftovers after 24 hours.
Optional variations: swap the white fish for scallops or mussels (pre-cooked), add a splash of pisco for a Peruvian touch, or substitute mango for some tomato for a sweet-heat contrast.

450 g (1 lb) whole edamame in pods, fresh or frozen
4 cups (1 L) water
1–2 tbsp kosher or sea salt (for boiling)
Flaky sea salt or coarse salt, to taste (for finishing)
Ice and cold water (for an ice bath, optional but recommended)
Optional: 1 tsp toasted sesame oil
Optional: 1 clove garlic, minced and lightly crushed; or 1/2 tsp chili flakes or shichimi togarashi for heat
Optional: 1 tsp soy sauce (for a tossed-flavor variation)
Optional: 1 tsp lemon or lime juice (brightens flavor)
If using frozen edamame, place them in a colander and rinse briefly under warm water to remove any ice glaze; they can be cooked from frozen. If fresh, rinse pods under cold water and trim any long stems if desired.
Bring 4 cups (1 L) of water to a rolling boil in a medium pot. Add 1–2 tablespoons of kosher or sea salt to the water (the water should taste noticeably salty).
Add the edamame pods to the boiling water. Stir once to prevent sticking and return to a boil.
Cook until the pods are tender but still slightly firm: about 3 minutes for very fresh beans, 3–5 minutes if frozen. Test one pod — the beans inside should be bright green and easy to squeeze out but not mushy.
Prepare an ice bath (bowl of cold water with ice) while the edamame cooks. When done, quickly drain the edamame and plunge into the ice bath for 1–2 minutes to stop cooking and preserve color and texture. (If you prefer to serve warm, you may skip the ice bath and simply drain.)
Drain thoroughly and transfer to a serving bowl. While still slightly damp, toss or sprinkle with flaky sea salt or coarse salt to taste so the seasoning adheres to the pods.
To eat: hold a pod, squeeze or bite the beans out of the pod with your teeth; discard the pods.
Optional tossed-flavor variation: after draining, while still warm, toss edamame with 1 teaspoon toasted sesame oil, 1 teaspoon soy sauce (or a pinch more salt), minced garlic and/or chili flakes or shichimi togarashi to taste, and a squeeze of lemon or lime if desired. Serve immediately.
Storage: Refrigerate cooled cooked edamame in an airtight container up to 3 days. Reheat briefly in a microwave or sauté with a little oil until warmed. Do not eat the pods; only consume the inner beans.

Serves: 2–3
Total time: 30–40 minutes (10–15 min prep, 15–20 min cook)
Main:
500 g (1.1 lb) boneless chicken (2 large breasts butterflied and pounded thin, or 4 boneless skinless thighs)
Salt and freshly ground black pepper
Optional: 1/2 tsp garlic powder or onion powder
120 g (1 cup) all-purpose flour
2 large eggs, beaten
200 g (2 cups) panko breadcrumbs
Vegetable oil (canola, sunflower or other neutral oil) for shallow frying — about 500 ml to 1 L for a 1–2 cm / 1"–1.5" oil depth
To serve:
Shredded cabbage, steamed rice, lemon wedges, Japanese mustard or mayonnaise
Tonkatsu sauce (optional, makes ~4 tbsp):
3 tbsp ketchup
2 tbsp Worcestershire sauce
1 tsp soy sauce
1 tsp mirin (or 1 tsp sugar dissolved)
1 tsp sugar (adjust to taste) — or use 3–4 tbsp store-bought tonkatsu sauce
Prepare the chicken: If using breasts, butterfly each and place between plastic wrap. Pound gently with a meat mallet until even thickness about 1 cm (1/3"). Trim excess edges so pieces are uniform. Pat dry with paper towels.
Season both sides of each chicken piece with salt, pepper and optional garlic/onion powder. Let rest a few minutes while setting up dredging station.
Set up three shallow dishes: one with flour, one with the beaten eggs, one with panko breadcrumbs. Lightly season the flour with a pinch of salt and pepper.
Dredge: Coat a chicken piece in flour, shaking off excess. Dip fully into beaten egg, then press into panko breadcrumbs so it’s completely covered. Press the panko firmly so it adheres well. Repeat for all pieces and place on a tray; rest 5–10 minutes to help the coating set.
Heat oil: Pour oil into a wide skillet or shallow pot to a depth of about 1–1.5 cm (1/2"–3/4") for shallow frying, or more if preferred for deep frying. Heat to 170–175°C (340–350°F). If you don’t have a thermometer, test by dropping a few panko crumbs: they should sizzle and brown evenly within ~30–40 seconds.
Fry in batches: Don’t overcrowd the pan. Carefully slide chicken into hot oil and fry 3–4 minutes per side (thinner pieces) or until golden brown and cooked through. Total fry time will depend on thickness — internal temperature should reach 75°C (165°F). Maintain oil temperature between batches; lower heat slightly if browning too fast.
Drain: Transfer cooked cutlets to a wire rack set over a baking sheet or to paper towels to drain for a minute. Resting on a rack keeps the crust crisp.
Slice: Let the cutlets rest 1–2 minutes, then slice diagonally into strips for serving (typical presentation).
Make tonkatsu sauce (if using): Whisk together ketchup, Worcestershire sauce, soy sauce, mirin (or dissolved sugar) and sugar until smooth. Taste and adjust sweetness/saltiness. Alternatively use store-bought tonkatsu sauce.
Serve: Plate sliced chicken katsu over or beside steamed rice, a mound of shredded cabbage, lemon wedge and a drizzle or small bowl of tonkatsu sauce. Add Japanese mustard or mayo on the side if desired.
Tips:
— For extra-crisp crust press panko into the egg-coated chicken and let the breaded pieces rest in the fridge for 10–15 minutes before frying.
— Maintain oil temperature to avoid greasy cutlets; adjust heat between batches.
— Use panko for the signature light, flaky crust — regular breadcrumbs will give a denser crust.
— Leftovers: Reheat in a 180°C (350°F) oven for 8–10 minutes to keep crisp rather than microwaving.
4–5 lb (1.8–2.3 kg) beef marrow and knuckle bones (for broth)
1–2 lb (450–900 g) beef oxtail or additional bones (optional, for richer broth)
1–1.5 lb (450–700 g) beef brisket or chuck (to simmer and serve)
8 oz (225 g) thinly sliced raw eye of round, sirloin or brisket (for quick-cooking topping)
1 lb (450 g) dried flat rice noodles (bánh phở) — amount for 6–8 bowls
2 large yellow onions, halved (charred)
1 large knob ginger (about 3–4 in / 80–120 g), halved lengthwise (charred)
5–6 whole star anise
2 cinnamon sticks (3–4 in / 7–10 cm)
6 whole cloves
1 tablespoon coriander seeds
2 green cardamom pods (optional)
1 teaspoon whole fennel seeds (optional)
1–2 tablespoons rock sugar or granulated sugar (to taste)
1/4 cup (60 ml) fish sauce, plus extra to taste
2 tablespoons kosher salt (adjust to taste)
6–8 liters (6–8 qts) cold water (enough to cover bones and meat)
2 tablespoons neutral oil (for charring spices/onion/ginger if using stovetop)
Garnishes: fresh Thai basil (1 bunch), cilantro (optional), lime wedges (6–8), bean sprouts (2–3 cups), thinly sliced jalapeño or Thai chilies, thinly sliced white onion or scallions, hoisin sauce and Sriracha (for serving)
Prepare and blanch the bones: place beef bones and any oxtail in a large stockpot and cover with cold water (about 6–8 liters). Bring to a rolling boil over high heat for 8–10 minutes to remove impurities. Turn off heat, drain bones and discard the cloudy water. Rinse bones under cold water and clean the pot to remove scum.
Char the onion and ginger: while bones blanch, char onion halves and ginger over an open flame, under a broiler, or in a dry skillet until well blackened on the cut sides (about 8–12 minutes). Rinse briefly under hot water to remove loose soot if desired and then smash ginger lightly to expose flesh.
Toast the spices: in a dry skillet over medium heat, toast star anise, cinnamon sticks, cloves, coriander seeds, cardamom and fennel seeds (if using) until fragrant, about 2–3 minutes. Be careful not to burn them. Place hot spices into a piece of cheesecloth or a spice sachet (or a loose tea infuser) for easy removal later.
Return bones to pot and add water: put the blanched bones and any meat for simmering (brisket/chuck) back into the cleaned pot. Pour in fresh cold water to cover by 1–2 inches (about 6–8 liters). Bring to a gentle simmer over medium heat.
Add charred aromatics and spices: add the charred onions and ginger and the spice sachet to the pot. Reduce heat to low so the broth barely simmers (small bubbles).
Skim frequently: for the first 1–1.5 hours, skim any scum and fat that rises to the surface every 10–15 minutes to keep the broth clear. Maintain a very gentle simmer; avoid boiling which clouds the broth.
Simmer for depth of flavor: simmer the broth gently for 3–6 hours (3 hours gives good flavor; 4–6 hours gives a deeper, more gelatinous broth). Add water if necessary to keep bones covered. During the last 30–45 minutes, add fish sauce, rock sugar and salt; adjust to taste near the end.
Remove solids and strain: after simmering, remove bones, meat and large aromatics. Take out the spice sachet. Strain the broth through a fine-mesh sieve lined with cheesecloth into a clean pot to remove tiny particles. Taste and adjust seasoning with fish sauce, salt and a little sugar as needed.
Finish the simmered brisket: if you simmered brisket/chuck in the broth, remove when tender (timing depends on size — often 1.5–2.5 hours). Let rest 10–15 minutes, then slice very thin across the grain. Reserve the slices for serving.
Clarify and degrease (optional for clearer broth): refrigerate the strained broth in a covered container until the fat solidifies on top (several hours or overnight). Skim off the fat and reheat the broth gently before serving. Or use a fat separation ladle or a paper towel skim for a cleaner-looking bowl.
Prepare noodles: for dried bánh phở, soak or cook according to package instructions — typically briefly soak in warm water until pliable and then blanch in boiling water 20–30 seconds until tender but not mushy. Drain and portion into bowls. For fresh noodles, briefly separate and blanch 5–10 seconds.
Slice raw beef thinly: freeze the raw eye of round or sirloin for 20–30 minutes to make very thin slicing easier. Cut across the grain into paper-thin slices and keep refrigerated until assembly.
Warm bowls and reheat broth: simultaneously, bring the strained broth to a rolling simmer. Heat bowls by rinsing with hot water or ladling some hot broth into them, then discard the water.
Assemble each bowl: divide noodles among bowls. Add a few slices of the tender simmered brisket and arrange several slices of raw beef on top (the raw beef will cook when hot broth is poured). Add thinly sliced onion or scallions if desired.
Ladle boiling broth over toppings: bring broth to a vigorous boil and pour it directly over the raw beef and noodles in each bowl — this will gently cook the thin raw slices. Add a few bean sprouts if you like them briefly cooked.
Serve with garnishes: serve immediately with a platter of Thai basil, cilantro, lime wedges, bean sprouts, thinly sliced chilies, hoisin and Sriracha. Allow diners to season their bowls with additional fish sauce, lime juice or chilies to taste.
Storage: cooled broth keeps in the refrigerator for 3–4 days or freezes well for several months. If refrigerated, skim off solidified fat and reheat to a rolling boil before serving.
Tips and variations: for a clearer broth, avoid stirring once simmering begins and skim frequently. For beefy depth, use a mix of marrow, knuckle and oxtail. For a lighter bowl, use only a small amount of simmered brisket and more thinly sliced raw beef. Adjust fish sauce and sugar for balanced savory-sweet flavor. Add a splash of hot broth to raw beef in a separate small bowl to test seasoning.

- 10 duck wings
- 1/4 cup soy sauce
- 2 tablespoons oyster sauce
- 1 tablespoon hoisin sauce
- 1 tablespoon Shaoxing wine
- 1 tablespoon sugar
- 3 slices fresh ginger
- 3 cloves garlic, minced
- 1 star anise
- 2 green onions, chopped
- 2 tablespoons vegetable oil
- 1 cup water
1. **Prepare the Marinade:** In a large bowl, combine the soy sauce, oyster sauce, hoisin sauce, Shaoxing wine, sugar, ginger, garlic, and star anise. Mix well to form a marinade.
2. **Marinate the Duck Wings:** Add the duck wings to the marinade, ensuring they are evenly coated. Cover the bowl and let them marinate for at least 2 hours or overnight in the refrigerator.
3. **Cook the Wings:** In a large pan, heat the vegetable oil over medium heat. Remove the wings from the marinade and add them to the pan, reserving the marinade. Brown the wings on all sides until golden.
4. **Simmer in Marinade:** Add the reserved marinade and 1 cup of water to the pan. Bring to a boil, then reduce the heat to low and cover. Let it simmer for about 30 minutes or until the wings are tender, stirring occasionally.
5. **Garnish and Serve:** Once cooked, transfer the wings to a serving platter. Garnish with chopped green onions and serve hot. Enjoy your flavorful Cantonese-style duck wings!

---

- 10 duck wings
- 2 tablespoons Szechuan peppercorns
- 3 tablespoons soy sauce
- 2 tablespoons chili paste
- 1 tablespoon rice wine vinegar
- 1 tablespoon honey
- 3 cloves garlic, minced
- 1-inch piece of fresh ginger, grated
- 2 tablespoons sesame oil
- 1 tablespoon cornstarch
- 2 tablespoons water
- Chopped cilantro for garnish
1. **Make the Marinade:** In a bowl, whisk together the soy sauce, chili paste, rice wine vinegar, honey, garlic, and ginger.
2. **Marinate the Wings:** Add the duck wings to the marinade, ensuring they are fully coated. Cover and let them marinate for at least 1 hour in the refrigerator.
3. **Cook the Wings:** Heat sesame oil in a large skillet over medium-high heat. Toast the Szechuan peppercorns for about 1 minute until fragrant. Add the marinated wings to the skillet.
4. **Thicken the Sauce:** Mix the cornstarch with 2 tablespoons of water to create a slurry. Add it to the skillet, stirring to thicken the sauce. Cook the wings for about 20-25 minutes, until they are cooked through and coated in a sticky, spicy glaze.
5. **Garnish and Serve:** Transfer the wings to a serving platter and garnish with chopped cilantro. Serve hot and enjoy the sensational heat of Szechuan cuisine!

- 1 pound spicy lamb sausage, sliced
- 1 cup lentils, rinsed
- 1 medium onion, chopped
- 2 cloves garlic, minced
- 2 carrots, diced
- 2 celery stalks, chopped
- 1 can (14.5 oz) diced tomatoes
- 4 cups chicken or vegetable broth
- 1 teaspoon cumin
- 1 teaspoon smoked paprika
- Salt and pepper to taste
- 2 tablespoons olive oil
- Fresh parsley, chopped (for garnish)
1. Heat the olive oil in a large pot over medium heat. Add the sliced sausage and cook until browned. Remove and set aside.
2. In the same pot, add the chopped onion, garlic, carrots, and celery. Sauté until the vegetables are soft, about 5 minutes.
3. Stir in the cumin and smoked paprika, then add the lentils, diced tomatoes, and broth. Bring to a boil.
4. Reduce the heat, cover, and let simmer for about 30 minutes, or until the lentils are tender. Add the cooked sausage back into the stew, season with salt and pepper, and simmer for an additional 5 minutes.
5. Serve hot, garnished with freshly chopped parsley.

---

- 1 pound spicy lamb sausage, sliced
- 2 cups Arborio rice or paella rice
- 1 bell pepper, chopped
- 1 onion, chopped
- 2 cloves garlic, minced
- 1 cup peas
- 4 cups chicken or seafood broth
- 1 teaspoon saffron threads
- 1 teaspoon smoked paprika
- 2 tablespoons olive oil
- Salt and pepper to taste
- Lemon wedges (for serving)
1. Heat the olive oil in a large paella pan or skillet over medium heat. Add the sliced sausage and cook until browned. Remove and set aside.
2. In the same pan, sauté the onion, garlic, and bell pepper for about 3 minutes until the onion is translucent.
3. Stir in the rice, smoked paprika, and saffron threads, ensuring the rice is well coated.
4. Pour in the broth and bring to a simmer. Reduce the heat to low and let it cook uncovered for 15 minutes.
5. Add the peas and cooked sausage, pressing them into the rice without stirring. Continue cooking until the rice is cooked and the liquid has been absorbed, about 10 minutes.
6. Remove from heat and let it rest for a few minutes. Serve with lemon wedges for squeezing over the paella.

- 2 bison steaks, about 8 ounces each
- Salt and freshly ground black pepper
- 2 tablespoons olive oil
- 1 cup fresh parsley leaves, chopped
- 4 cloves garlic, minced
- 1/3 cup red wine vinegar
- 1 teaspoon dried oregano
- 1/2 teaspoon red pepper flakes
- 1/2 cup extra virgin olive oil
1. **Prepare the Chimichurri Sauce**
   In a food processor or blender, combine the parsley, garlic, red wine vinegar, oregano, and red pepper flakes. Pulse until finely chopped. While the machine is running, slowly add the 1/2 cup of extra virgin olive oil until the mixture is well blended. Season with salt and pepper to taste. Set aside.

2. **Grill the Bison Steaks**
   Preheat your grill to medium-high heat. Rub the bison steaks with 2 tablespoons of olive oil and season generously with salt and black pepper on both sides. Place the steaks on the grill, cooking for about 4-5 minutes per side for medium-rare, or until they reach your desired doneness. Remove the steaks from the grill and let them rest for 5 minutes. Serve the steaks topped with the chimichurri sauce.

---

- 2 bison steaks, about 8 ounces each
- Salt and freshly ground black pepper
- 2 tablespoons olive oil
- 2 shallots, finely chopped
- 1 cup red wine
- 2 sprigs fresh thyme
- 2 tablespoons butter
- 1 teaspoon balsamic vinegar
1. **Prepare the Red Wine Reduction**
   In a medium saucepan over medium heat, add 1 tablespoon of olive oil and the chopped shallots. Sauté the shallots until they become translucent. Add the red wine and thyme sprigs. Bring the mixture to a simmer and let it reduce to about half its original volume. Remove the thyme sprigs, add the balsamic vinegar, and then stir in the butter until the sauce is glossy. Season with salt and pepper to taste.

2. **Cook the Bison Steaks**
   Heat the remaining olive oil in a large skillet over medium-high heat. Season the bison steaks generously with salt and black pepper on both sides. Add the steaks to the skillet and cook for about 4-5 minutes per side for medium-rare, or until they reach your desired doneness. Allow the steaks to rest for 5 minutes, then serve with the red wine reduction drizzled on top.

- 1 Whole Pheasant
- 2 tablespoons olive oil
- Salt and pepper to taste
- 2 sprigs fresh rosemary
- 2 sprigs fresh thyme
- 2 cloves garlic, crushed
- 1 lemon, halved
- 1 cup chicken stock
1. Preheat the oven to 375°F (190°C). Pat the pheasant dry with paper towels and season the inside and outside with salt and pepper.

2. Stuff the cavity of the pheasant with rosemary, thyme, garlic, and one half of the lemon. Tie the legs together with kitchen twine.

3. Rub the outside of the pheasant with olive oil and squeeze the juice from the remaining lemon half over it.

4. Place the pheasant on a roasting rack in a baking dish and pour the chicken stock into the bottom of the dish.

5. Roast for 45 minutes to 1 hour, basting occasionally with the juices from the pan, until the pheasant is golden brown and the internal temperature reaches 165°F (74°C).

6. Let the pheasant rest for 10 minutes before carving and serving.

---

- 1 Whole Pheasant, cut into pieces
- Salt and pepper to taste
- 2 tablespoons butter
- 2 onions, sliced
- 3 carrots, sliced
- 2 stalks celery, chopped
- 2 cloves garlic, minced
- 1 cup mushrooms, sliced
- 1 cup red wine
- 1 cup chicken stock
- 1 sprig fresh thyme
- 1 bay leaf
1. Season the pheasant pieces with salt and pepper. Melt the butter in a large sauté pan over medium-high heat. Brown the pheasant pieces on all sides and remove them from the pan.

2. In the same pan, add onions, carrots, celery, garlic, and mushrooms. Cook until the vegetables are soft, about 5 minutes.

3. Add red wine, chicken stock, thyme, and bay leaf to the pan. Return the pheasant pieces to the pan and bring the mixture to a simmer.

4. Preheat the oven to 350°F (175°C). Transfer the contents of the pan to a casserole dish, cover with a lid or foil, and bake for 1 1/2 to 2 hours, or until the pheasant is tender.

5. Remove the bay leaf and thyme sprig before serving. Serve hot with a side of mashed potatoes or crusty bread.

---

- 1 Whole Pheasant, cooked and shredded
- 1 cup carrots, diced
- 1 cup peas
- 1 cup potatoes, diced
- 1 onion, chopped
- 3 tablespoons butter
- 3 tablespoons flour
- 2 cups chicken or pheasant stock
- Salt and pepper to taste
- 1 teaspoon fresh thyme, chopped
- 1 sheet puff pastry, thawed
- 1 egg, beaten
1. Preheat the oven to 400°F (200°C). In a large saucepan, melt butter over medium heat and sauté the onions until soft.

2. Stir in the flour and cook for 1 minute, forming a roux. Gradually add the chicken stock, whisking continuously until thickened.

3. Add the carrots, peas, potatoes, shredded pheasant, salt, pepper, and thyme to the saucepan. Simmer for 10-15 minutes until the vegetables are just tender.

4. Pour the mixture into a pie dish. Cover with puff pastry, trimming any excess, and crimp the edges with a fork. Brush the pastry with beaten egg.

5. Cut a few slits in the top of the pastry to allow steam to escape. Bake for 25-30 minutes, or until the pastry is golden brown.

6. Let cool slightly before serving to allow the filling to set. Enjoy warm.

- 1 Leg of Lamb (4-5 lbs)
- 4 cloves garlic, minced
- 2 tablespoons olive oil
- 1 tablespoon ground cumin
- 1 tablespoon ground coriander
- 1 tablespoon paprika
- 1 teaspoon ground cinnamon
- 1 teaspoon ground allspice
- Salt to taste
- Freshly ground black pepper to taste
- Juice of 1 lemon
- Zest of 1 lemon
- 1/4 cup fresh parsley, chopped
1. **Prepare the Marinade**: In a small bowl, combine the minced garlic, olive oil, cumin, coriander, paprika, cinnamon, allspice, lemon juice, and lemon zest. Mix well until you have a smooth marinade.
2. **Marinate the Lamb**: Pat the leg of lamb dry with paper towels. Rub the marinade all over the lamb, ensuring it is entirely covered. Season generously with salt and pepper. Cover and refrigerate for at least 4 hours, preferably overnight.
3. **Preheat the Oven**: Preheat your oven to 375°F (190°C).
4. **Roast the Lamb**: Place the marinated leg of lamb on a roasting rack in a roasting pan. Roast in the preheated oven for about 1.5 to 2 hours, or until the internal temperature reaches your desired doneness (145°F for medium-rare, 160°F for medium).
5. **Rest and Serve**: Remove the lamb from the oven and let it rest for 15-20 minutes before carving. This allows the juices to redistribute. Garnish with chopped parsley and serve with your choice of side dishes. Enjoy this traditional Egyptian delight!

- 1 (3-4 lb) eye of round roast
- 2 tablespoons olive oil
- 4 cloves garlic, minced
- 1 tablespoon fresh rosemary, chopped
- 1 tablespoon fresh thyme, chopped
- 1 tablespoon fresh parsley, chopped
- 1 tablespoon salt
- 1 tablespoon black pepper
1. **Preheat the Oven:** Preheat your oven to 450°F (232°C).
2. **Prepare the Herb Mixture:** In a small bowl, combine the minced garlic, rosemary, thyme, parsley, salt, and black pepper.
3. **Season the Roast:** Rub the olive oil all over the eye of round roast, then generously coat it with the herb mixture.
4. **Roasting:** Place the seasoned roast on a rack in a roasting pan. Roast uncovered in the preheated oven for 20 minutes.
5. **Lower the Temperature:** Reduce the oven temperature to 325°F (163°C) and continue roasting until the internal temperature reaches 135°F (57°C) for medium-rare, about 1 1/4 to 1 1/2 hours.
6. **Rest the Roast:** Remove the roast from the oven, tent with foil and let it rest for about 15-20 minutes. This helps to settle the juices.
7. **Slice and Serve:** Carve the roast into thin slices against the grain and serve with your choice of sides.

---

- 1 (3-4 lb) eye of round roast
- 2 tablespoons vegetable oil
- Salt and pepper, to taste
- 1 onion, roughly chopped
- 2 carrots, roughly chopped
- 2 stalks celery, roughly chopped
- 4 cups beef broth
- 2 tablespoons all-purpose flour
- 2 tablespoons unsalted butter
1. **Season the Roast:** Preheat your oven to 450°F (232°C). Season the eye of round roast generously with salt and pepper.
2. **Sear the Roast:** Heat vegetable oil in a large skillet over medium-high heat. Sear the roast on all sides until browned, about 3-4 minutes per side.
3. **Prepare Vegetables:** Place the chopped onion, carrots, and celery in the bottom of a roasting pan. Set the seared roast on top of the vegetables.
4. **Roast the Meat:** Place the roasting pan in the oven and roast for 20 minutes. Reduce temperature to 325°F (163°C) and continue roasting until the internal temperature reaches 135°F (57°C) for medium-rare, about 1 1/4 to 1 1/2 hours.
5. **Make the Gravy:** Once the roast is done, remove it and the vegetables from the pan. Skim excess fat from the pan drippings, reserving about 2 tablespoons. Add butter and flour to the drippings and cook over medium heat, stirring, until browned. Gradually whisk in the beef broth, scraping the bottom of the pan. Cook until the gravy thickens.
6. **Serve:** Slice the roast thinly and serve with the warm gravy. Optionally, serve the roasted vegetables on the side.

- 2 large ripe tomatoes
- 8 ounces fresh mozzarella cheese
- 1 bunch fresh basil leaves
- 2 tablespoons extra virgin olive oil
- 1 tablespoon balsamic vinegar
- Salt and freshly ground black pepper, to taste
1. Slice the tomatoes and mozzarella into 1/4-inch thick rounds.
2. On a platter, alternate layers of tomato, mozzarella, and basil leaves until all ingredients are used.
3. Drizzle the olive oil and balsamic vinegar evenly over the salad.
4. Season with salt and freshly ground black pepper to taste.
5. Serve immediately or chill in the refrigerator for 30 minutes before serving for enhanced flavor.

- Eastern oysters (12, shucked on the half shell)
- 2 tablespoons unsalted butter
- 1 small shallot, finely chopped
- 2 cloves garlic, minced
- 1 cup fresh spinach, chopped
- 1/4 cup parsley, chopped
- 1/4 cup breadcrumbs
- 1/4 cup grated Parmesan cheese
- 1 tablespoon Pernod or anise-flavored liqueur (optional)
- Salt and pepper to taste
- Lemon wedges, for serving
1. Preheat your oven to 450°F (230°C). Arrange the oysters on a baking sheet covered with a layer of rock salt to keep them stable.
2. In a pan, melt the butter over medium heat, and sauté the shallot and garlic until soft. Add spinach and cook until wilted. Stir in parsley, breadcrumbs, Parmesan, Pernod, salt, and pepper. Spoon a generous teaspoon of the mixture over each oyster.
3. Bake the oysters in the oven for about 8-10 minutes, or until the topping is golden and bubbling. Serve immediately with lemon wedges on the side.

---

- Eastern oysters (dozen, shucked and served on the half shell)
- Crushed ice, for serving
- 1/4 cup red wine vinegar
- 2 tablespoons shallots, finely minced
- 1 teaspoon freshly cracked black pepper
- Lemon wedges, for serving
- Hot sauce (optional)
1. Prepare a platter with crushed ice and arrange the shucked oysters on top to keep them chilled.
2. In a small bowl, mix together the red wine vinegar, minced shallots, and black pepper to create the mignonette sauce. Let it sit for about 10 minutes to meld flavors.
3. Serve the oysters with a spoonful of mignonette sauce over each, and provide lemon wedges and hot sauce on the side for preference. Enjoy immediately.

- 4 pounds bone-in beef short ribs
- Salt and freshly ground black pepper
- 2 tablespoons vegetable oil
- 1 large onion, diced
- 2 carrots, peeled and diced
- 2 celery stalks, diced
- 2 tablespoons tomato paste
- 3 tablespoons all-purpose flour
- 2 cups red wine (such as Cabernet Sauvignon or Merlot)
- 4 cups beef stock
- 2 sprigs of fresh rosemary
- 2 sprigs of fresh thyme
- 2 bay leaves
- 4 cloves garlic, minced
1. Preheat your oven to 325°F (160°C).
2. Season the short ribs generously with salt and black pepper.
3. Heat the vegetable oil in a large Dutch oven or oven-safe pot over medium-high heat. Sear the short ribs on all sides until they are browned, approximately 8 minutes. Remove the ribs and set them aside.
4. In the same pot, add the onion, carrots, and celery. Sauté until softened, about 5 minutes.
5. Stir in the tomato paste and cook for another 2 minutes, then sprinkle with flour and stir well to combine.
6. Pour in the red wine, scraping up any bits from the bottom of the pot. Let it simmer for about 5 minutes to reduce slightly.
7. Add back the short ribs to the pot, then pour in the beef stock until the ribs are mostly submerged. Add the rosemary, thyme, bay leaves, and minced garlic.
8. Bring the mixture to a simmer, cover it with a lid, and transfer to the preheated oven. Cook for 2.5 to 3 hours, or until the short ribs are fork-tender.
9. Remove the pot from the oven and discard the herb sprigs and bay leaves. Skim off any excess fat from the surface.
10. Serve the short ribs with the sauce over mashed potatoes or polenta, garnishing with fresh herbs if desired.

---

- 3 pounds flanken-style beef short ribs
- 1 cup soy sauce
- 1/2 cup brown sugar
- 1/2 cup water
- 1 small onion, grated
- 4 cloves garlic, minced
- 2 tablespoons sesame oil
- 2 tablespoons rice wine vinegar
- 1 tablespoon freshly grated ginger
- 1 teaspoon black pepper
- 2 green onions, chopped
- 2 tablespoons sesame seeds
1. In a large bowl, combine soy sauce, brown sugar, water, grated onion, minced garlic, sesame oil, rice wine vinegar, grated ginger, and black pepper. Mix until the sugar is dissolved to create the marinade.
2. Add the short ribs to the marinade, ensuring they are fully coated. Cover and refrigerate for at least 4 hours or overnight for the best flavor infusion.
3. Preheat a grill to medium-high heat. Remove the short ribs from the marinade, allowing the excess to drip off.
4. Grill the short ribs for about 4-5 minutes per side, until they are nicely charred and cooked through.
5. Sprinkle the grilled ribs with chopped green onions and sesame seeds.
6. Serve the Kalbi with steamed rice and side dishes like kimchi or pickled vegetables for a traditional Korean meal experience.

- 4 boneless, skinless chicken breasts
- 1/4 cup olive oil
- 1/4 cup freshly squeezed lemon juice
- 3 cloves garlic, minced
- 1 tablespoon fresh thyme, chopped
- 1 tablespoon fresh rosemary, chopped
- Salt and pepper to taste
1. In a small bowl, mix together the olive oil, lemon juice, minced garlic, thyme, rosemary, salt, and pepper. Place the chicken breasts in a large resealable plastic bag and pour the marinade over them. Marinate in the fridge for at least 30 minutes, or up to 8 hours for more flavor.

2. Preheat the grill to medium-high heat. Remove the chicken from the marinade and grill for 6-7 minutes on each side, or until the internal temperature reaches 165°F (75°C). Allow the chicken to rest for a few minutes before serving.

- 4 salmon fillets (about 6 ounces each)
- 2 tablespoons Dijon mustard
- 1/4 cup panko breadcrumbs
- 2 tablespoons fresh parsley, chopped
- 1 tablespoon fresh dill, chopped
- 1 tablespoon olive oil
- Salt and pepper, to taste
1. Preheat your oven to 400°F (200°C). Place the salmon fillets on a baking sheet lined with parchment paper. Spread a thin layer of Dijon mustard over each fillet.

2. In a bowl, mix together the panko breadcrumbs, parsley, dill, olive oil, salt, and pepper. Spoon the breadcrumb mixture over the salmon fillets, pressing gently to adhere. Bake the salmon for 12-15 minutes, or until the salmon is opaque and flakes easily with a fork.

Both of these entrees are easy to prepare and complement your delightful berry dessert, creating a harmonious and satisfying meal.

- 4 boneless, skinless chicken breasts
- Salt and pepper, to taste
- 2 tablespoons olive oil
- 1 cup blackberries
- 1 cup raspberries
- 1 cup balsamic vinegar
- 2 tablespoons honey
- 1/2 cup Greek yogurt
- Fresh thyme for garnish (optional)
1. **Prepare the Chicken**: Season the chicken breasts with salt and pepper. Heat olive oil in a grill pan over medium-high heat. Grill the chicken for 6-7 minutes on each side or until fully cooked and juices run clear. Remove from heat and cover with foil to keep warm.
2. **Make the Berry Balsamic Reduction**: In a saucepan, combine the blackberries, raspberries, balsamic vinegar, and honey. Bring to a boil over medium heat, then reduce to a simmer and cook for about 10-15 minutes, stirring occasionally, until the mixture thickens. Remove from heat and strain to remove seeds if desired.
3. **Finish the Dish**: Serve each chicken breast drizzled with the berry balsamic reduction and a dollop of Greek yogurt. Garnish with fresh thyme if using.

---

- 2 duck breasts
- Salt and pepper, to taste
- 1 tablespoon olive oil
- 1 cup strawberries, hulled and quartered
- 1/2 cup raspberries
- 1/4 cup sugar
- Zest of 1 orange
- 1/2 cup Greek yogurt for serving
1. **Prepare the Duck**: Preheat the oven to 400°F (200°C). Score the skin of the duck breasts in a crisscross pattern and season with salt and pepper. Heat olive oil in an ovenproof skillet over medium heat. Place duck breasts skin-side down and cook for 6-8 minutes until the skin is crispy. Flip the duck and transfer the skillet to the oven. Roast for another 6-8 minutes.
2. **Make the Berry Compote**: While the duck is roasting, combine the strawberries, raspberries, sugar, and orange zest in a small saucepan. Heat over medium heat, stirring occasionally, until the mixture starts to thicken and berries are soft, about 10 minutes. Remove from heat and let cool slightly.
3. **Finish the Dish**: Allow the duck to rest for a few minutes before slicing. Serve with a generous spoonful of berry compote on top and a dollop of Greek yogurt on the side.

---
- 1 pork tenderloin (about 1 lbs)
- 1 teaspoon smoked paprika
- 1 teaspoon ground cumin
- Salt and pepper, to taste
- 2 tablespoons olive oil
- 1/2 cup blackberries
- 1/2 cup raspberries
- 1/2 cup strawberries, hulled and sliced
- 1/4 cup honey
- 1/4 cup balsamic vinegar
- 1/2 cup Greek yogurt for garnish
1. **Prepare the Pork**: Preheat the oven to 375°F (190°C). Mix the smoked paprika, cumin, salt, and pepper in a small bowl. Rub this mixture all over the pork tenderloin.
2. **Cook the Pork**: Heat olive oil in an ovenproof skillet over medium-high heat. Sear the pork on all sides until browned, about 6 minutes in total. Transfer the skillet to the oven and roast for 15-20 minutes or until the internal temperature reaches 145°F (63°C).
3. **Make the Berry Sauce**: In a small saucepan, combine the blackberries, raspberries, strawberries, honey, and balsamic vinegar. Cook over medium heat until the berries break down and the sauce thickens, about 10-15 minutes.
4. **Finish the Dish**: Remove the pork from the oven and allow it to rest for 5 minutes before slicing. Serve with the berry sauce drizzled over the top and a dollop of Greek yogurt on the side for added creaminess.

8–10 lb (3.6–4.5 kg) pork shoulder (Boston butt), bone-in or boneless
1–2 tablespoons Hawaiian sea salt (alaea salt preferred) or kosher salt, plus extra to taste
2–3 tablespoons liquid smoke (kālua flavor) — optional but commonly used for home preparation
4–6 ti leaves or banana leaves (optional, for authentic flavor and wrapping) or large collard leaves
4–6 cups water or chicken broth (for oven or slow-cooker)
4–6 cloves garlic, smashed (optional)
1–2 tablespoons neutral oil (if searing first) — optional
Butcher twine (if trussing)
Heavy-duty aluminum foil (for oven method) or a roasting pan with lid
For traditional imu method only: hot volcanic rocks, dry kindling, shovels, and enough earth to cover the pit
Overview: Kalua pig is traditionally cooked in an underground oven (imu) using hot rocks and ti or banana leaves. The following gives a traditional summary and two home-kitchen methods (oven and slow cooker) that reproduce the smoky, tender result.
Prep the pork: Pat the pork shoulder dry. Rub the meat all over with 1–2 tablespoons of Hawaiian sea salt (use more for a stronger salty profile). Optionally rub smashed garlic over the pork.
If using liquid smoke (home method): Brush or rub 2–3 tablespoons of liquid smoke evenly over the pork to introduce smoky, imu-like aroma.
Wrap in leaves (authentic step, optional for home cooks): Lay 2–3 ti or banana leaves flat (lightly wilt over flame or in oven to make pliable). Place the pork on the leaves and wrap tightly. Tie with butcher twine. If leaves are unavailable, proceed with heavy-duty foil.
Traditional imu method (summary / requires community and safety):
  a. Dig a pit about 2–3 feet deep and wide enough to hold the wrapped pork and hot rocks. Line the bottom with stones.
  b. Build a wood fire on the stones until the rocks are very hot and white from heat; burn down to coals. Remove embers but leave hot rocks in place, or carefully move rocks and set meat on top of the rocks.
  c. Place additional banana/ti leaves over the hot rocks, then set the wrapped pork on top. Cover the pork with more leaves, burlap, and then pack the pit with earth to seal heat and steam in. Cook 6–8 hours for a large shoulder (longer for larger pieces) until meat is fall-apart tender.
  d. When done, carefully uncover (steam will be extremely hot), remove meat, shred, and season to taste.
Oven method (recommended for most home cooks):
  a. Preheat oven to 325°F (165°C). Place a rack in a roasting pan or use a deep baking dish.
  b. If you like a browned exterior, sear the pork shoulder in a hot skillet with 1–2 tablespoons oil, browning all sides for 3–4 minutes per side (optional).
  c. Place the wrapped pork (leaf-wrapped) or the pork on a bed of leaves in the roasting pan. Add 1–2 cups water or broth to the bottom of the pan for moisture. If not using leaves, wrap the pork tightly in heavy-duty foil, adding 1–2 tablespoons liquid smoke under the foil if desired.
  d. Cover tightly with lid or additional foil. Roast at 325°F (165°C) for 4–6 hours for 8–10 lb, or until internal temperature is 195–205°F (90–96°C) and the meat shreds easily. Check after 3–4 hours and add more liquid if pan is dry.
  e. Remove from oven, unwrap carefully to avoid steam, and transfer to a cutting board. Let rest 15–20 minutes, then shred the meat with two forks or meat claws. Mix in pan juices and additional salt to taste. If you want a crispier edge, spread shredded pork on a rimmed sheet and bake at 425°F (220°C) for 10–15 minutes, stirring once, to caramelize.
Slow-cooker method (convenient, hands-off):
  a. Season/stuff and optionally sear the pork as above. Place pork in slow cooker, add 1–2 tablespoons liquid smoke (optional), smashed garlic, and 1–2 cups water or broth. If using leaves, wrap the pork in leaves first.
  b. Cook on LOW for 8–10 hours or HIGH for 4–6 hours, until meat is fall-apart tender. Shred and mix with cooking juices. Adjust salt.
Finishing and serving: Shred the pork finely to resemble traditional kalua texture. Taste and add more Hawaiian salt if desired. Serve hot over steamed rice and accompany with lūʻau-style sides such as poi, lomi-lomi salmon, macaroni salad, or steamed cabbage.
Storage and reheating: Cool completely, refrigerate in an airtight container up to 4 days or freeze up to 3 months. Reheat gently in a covered pan with a splash of water or broth, or microwave covered, to restore moisture.
Notes and tips: Authentic kalua pig gets its flavor from the imu—smoky, slightly salty, and steamy. Liquid smoke and banana/ti leaves help approximate that at home. Use alaea (red) salt for the most traditional Hawaiian flavor when available. Always take safety precautions if attempting an imu (community permission, correct ventilation, careful handling of hot rocks and earth).

1 lb (450 g) ground pork (or 50/50 pork-beef mix)
1 small yellow onion, finely chopped (about 3/4 cup)
3 cloves garlic, minced
1 medium carrot, finely grated or minced (about 1/2 cup)
1/3 cup finely chopped water chestnuts or jicama (optional, for crunch)
2 scallions, thinly sliced
2 tablespoons soy sauce
1 tablespoon oyster sauce (optional)
1 teaspoon kosher salt
1/2 teaspoon ground black pepper
1/2 teaspoon sugar
1 large egg, lightly beaten (for binding)
30–40 lumpia wrappers (spring roll wrappers), about 6–7 inches square
1 egg beaten with 1 tablespoon water (egg wash to seal)
Vegetable oil, for deep frying (about 2–3 cups depending on pan depth)
For vinegar dipping sauce (sawsawan):
1/2 cup cane vinegar or white vinegar
1 tablespoon soy sauce
1-2 cloves garlic, minced
1 small chile (bird's eye or serrano), thinly sliced (optional)
1 teaspoon sugar (optional) or to taste
Alternative sweet chili or sweet-and-sour sauce, for serving (optional)
Prepare workspace and wrappers: Lay out lumpia wrappers stacked under a lightly damp towel to keep them from drying. Line a baking sheet with paper towels for finished rolls.
Make the filling: In a large bowl combine ground pork, chopped onion, minced garlic, grated carrot, chopped water chestnuts (if using), scallions, soy sauce, oyster sauce (if using), salt, pepper, sugar, and the lightly beaten egg. Mix thoroughly until evenly combined but do not overwork — use your hands or a spoon.
Test seasoning: Fry a small teaspoon of the mixture in a skillet until cooked through and taste; adjust salt or soy sauce as needed.
Assemble lumpia: Place one wrapper on a clean surface in diamond orientation (point facing you). Spoon about 1 to 1 1/2 tablespoons of filling near the bottom third of the wrapper, forming a log about 3 inches long. Do not overfill.
Roll and seal: Fold the bottom corner up over the filling, fold the two side corners in snugly, then finish rolling away from you. Brush the top corner's edge with the egg wash and press to seal. Repeat with remaining wrappers and filling. Place finished rolls seam-side down on the prepared baking sheet.
Heat oil: In a deep skillet or pot, heat 1 1/2 to 2 inches of vegetable oil to 350–375°F (175–190°C). If you don't have a thermometer, test with a small piece of wrapper — it should sizzle and brown steadily without burning.
Fry in batches: Fry lumpia in small batches (6–8 at a time depending on pan size) seam-side down first for 2–4 minutes, turning occasionally so they brown evenly. Total fry time is about 4–6 minutes per batch until deep golden and crisp. Keep the oil temperature steady; if it drops, the rolls will absorb oil and become greasy.
Drain: Remove lumpia with a slotted spoon and drain on the paper towel-lined sheet or a wire rack. Serve warm.
Make the vinegar dipping sauce (sawsawan): In a small bowl combine vinegar, soy sauce, minced garlic, sliced chile (if using) and sugar to taste. Stir until sugar dissolves. Adjust sweet/sour/salty balance to preference. Alternatively serve with sweet chili sauce or sweet-and-sour sauce.
Baking option (lower-fat): Preheat oven to 400°F (200°C). Place lumpia seam-side down on a baking sheet lined with parchment, brush or spray lightly with oil, and bake 15–20 minutes, turning halfway, until golden and crisp. Texture will be slightly different than fried.
Freezing and make-ahead: To freeze raw lumpia, place assembled rolls on a tray lined with parchment and freeze until solid (1–2 hours), then transfer to a freezer bag. Fry from frozen, adding 1–2 minutes to frying time, or bake from frozen at 400°F (200°C) for 20–25 minutes.
Serving suggestions: Serve hot with vinegar dipping sauce and/or sweet chili sauce. Lumpia Shanghai is commonly served as an appetizer, finger food, or with steamed rice as part of a meal.

1 cup (120 g) all-purpose flour
1/4 cup (30 g) rice flour (optional — for extra crispness)
1 large egg
1 1/4 cups (300 ml) cold water
1 teaspoon fine salt
6–8 medium scallions (파), trimmed and cut into 2–3 inch (5–7 cm) lengths
Optional: 8 oz (225 g) mixed seafood (shrimp, squid, mussels), chopped — for haemul pajeon
2–4 tablespoons neutral oil (vegetable, canola) for frying
1 teaspoon toasted sesame oil (optional, to finish)
For the dipping sauce:
3 tablespoons soy sauce
1 tablespoon rice vinegar
1 teaspoon sugar or honey
1 teaspoon sesame oil
1 clove garlic, minced
1 tablespoon finely sliced scallion (or green onion)
1/2 teaspoon gochugaru (Korean red pepper flakes) or a pinch of chili flakes (optional)
1 teaspoon toasted sesame seeds (optional)
Make the dipping sauce: Whisk together soy sauce, rice vinegar, sugar, sesame oil, minced garlic, sliced scallion, gochugaru (if using), and sesame seeds. Adjust seasoning to taste and set aside.
Prepare scallions (and seafood if using): Trim roots and any wilted tops from scallions and cut into 2–3 inch lengths. If using seafood, pat it dry and chop into bite-sized pieces.
Make the batter: In a bowl, combine all-purpose flour, rice flour (if using) and salt. Beat the egg lightly in a separate bowl, then whisk egg and cold water into the flour until just combined. Batter should be somewhat thin — pourable but coating; add a little more water if necessary. Do not overmix.
Heat the pan: Place a large nonstick or cast-iron skillet over medium-high heat. Add 1–2 tablespoons neutral oil and swirl to coat so the entire cooking surface is lightly oiled.
Assemble in the pan: Arrange the scallions in a neat layer across the pan (you can lay them all in one direction). If using seafood, distribute it evenly among the scallions. Pour batter over the scallions and seafood to cover them in a thin layer (about 1/4 inch / 6 mm thick). If you prefer a more blended pancake, mix scallions into the batter first and then pour.
Cook the first side: Reduce heat to medium. Let the pancake cook undisturbed until the edges look set and crisp and bubbles form on the surface, about 3–5 minutes. Peek underneath with a spatula — it should be golden brown.
Flip carefully: Slide a wide spatula under the pancake. If it's large, invert it onto a flat plate, then slide it back into the pan to cook the second side. Add another tablespoon of oil to the pan edge if needed. Cook until the second side is golden and the pancake is cooked through, another 3–4 minutes. Press gently with the spatula for even contact.
Finish and rest: When both sides are crisp and golden, drizzle with the teaspoon of toasted sesame oil (optional) and remove the pancake to a cutting board. Let rest 1–2 minutes so it firms up and is easier to slice.
Serve: Cut into wedges or square pieces. Serve hot with the prepared dipping sauce. Pajeon is best eaten immediately while crisp.
Tips: Use cold water and a slightly loose batter for a lighter texture. For extra crispiness, add a little more rice flour or use a hotter pan (watching carefully to avoid burning). Leftovers can be reheated in a skillet to restore crispness.
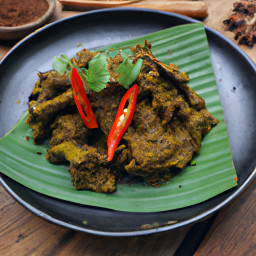
1 kg (2.2 lb) beef chuck or brisket, trimmed and cut into 2–3 cm (1 inch) cubes
2 tbsp neutral oil (vegetable or coconut) for sautéing
400 ml (14 fl oz) coconut milk (1 can)
200 ml (7 fl oz) water (adjust as needed)
4–6 kaffir lime leaves, torn or bruised
1–2 stalks lemongrass (white part only), bruised and tied or thinly sliced
1 tbsp tamarind paste (or 1 tbsp lime juice as substitute)
1–2 tbsp palm sugar or brown sugar (to taste)
Salt, to taste
Optional: 1 turmeric leaf, torn (if available)

For the wet spice paste:
8 shallots, peeled
6–8 cloves garlic, peeled
4–6 large red chilies (adjust heat) or 8–10 dried red chilies, soaked and seeded
2–3 cm (¾–1 in) galangal, peeled and chopped (or 1 tsp galangal powder)
2–3 cm (¾–1 in) fresh ginger, peeled and chopped
2 stalks lemongrass (white part), finely sliced (use additional if not using whole stalks above)
1–2 cm fresh turmeric or 1 tsp turmeric powder (optional)
2 tbsp water or oil to help blend

Whole/toast spices (to grind):
2 tsp coriander seeds
1 tsp cumin seeds
1 tsp fennel seeds
4-6 white or black peppercorns
3 green cardamom pods
3 cloves
1 small cinnamon stick (2–3 cm)
2 star anise (optional)

Kerisik (toasted coconut paste):
1 cup (about 80–100 g) freshly grated coconut (or desiccated if fresh not available), toasted until deep golden and ground into a paste

Garnish/serve:
Steamed rice or ketupat, and cucumber or sambal on the side
Prepare the beef: Trim excess fat and cut beef into 2–3 cm (1 inch) cubes. Pat dry and set aside.
Toast and grind whole spices: In a dry skillet over medium heat, toast coriander, cumin, fennel, peppercorns, cardamom, cloves, cinnamon and star anise until aromatic (1–2 minutes). Let cool, then grind to a fine powder using a spice grinder or mortar and pestle. Set aside.
Make the wet spice paste: In a blender or food processor combine shallots, garlic, red chilies, galangal, ginger, sliced lemongrass, turmeric (if using) and 2 tbsp water or oil. Blend to a smooth paste, scraping down sides as needed. If mixture is too thick, add 1–2 tbsp more water.
Sauté paste: Heat 2 tbsp oil in a heavy-bottomed pot or Dutch oven over medium heat. Add the wet spice paste and sauté, stirring frequently, until the raw smell cooks off and the paste thickens and darkens slightly (6–10 minutes).
Add ground toasted spices: Stir the ground whole spices into the sautéed paste and cook for another 1–2 minutes to bloom the spices.
Brown the beef: Increase heat to medium-high. Add the beef pieces and cook, stirring, until the surfaces are sealed and coated with the spice mixture (3–5 minutes).
Add liquids and aromatics: Pour in the coconut milk and about 200 ml (7 fl oz) water. Add kaffir lime leaves, bruised lemongrass stalks (if using whole), tamarind paste, palm sugar and a pinch of salt. Stir to combine and bring to a gentle simmer.
Simmer gently, uncovered: Reduce heat to low so the pot maintains a gentle simmer. Cook uncovered for 1.5–2 hours, stirring every 10–15 minutes and scraping the bottom to prevent sticking. Add small splashes of water if the mixture becomes too dry before the meat is tender. The goal is long, slow cooking so the beef becomes very tender and the sauce reduces and concentrates.
Reduce to drier rendang: As the beef becomes tender and the liquid reduces, continue to cook until the sauce darkens, oil separates and almost all liquid has evaporated—this can take another 30–60 minutes depending on heat and pot. Stir more frequently near the end to avoid burning; lower the heat if necessary.
Add kerisik: When the sauce has mostly reduced and the beef is tender, stir in the kerisik (toasted coconut paste). Cook another 5–10 minutes, stirring, until the kerisik is integrated and the rendang is thick and coats the beef pieces. Taste and adjust seasoning with salt and a little sugar or tamarind if needed.
Finish and rest: Remove from heat. Discard bruised lemongrass stalks and any large stems of kaffir lime leaf or turmeric leaf. Let the rendang rest for 10–15 minutes to let flavors settle.
Serve: Serve Beef Rendang hot with steamed rice, ketupat or lontong, and garnishes such as sliced cucumber or a simple sambal.
Notes and tips: Use low, steady heat for best results—too high and the bottom will burn before the beef is tender. Traditional rendang is cooked until almost dry and deep brown with spicy, caramelized flavors. Kerisik adds nuttiness and thickens the sauce; if you can’t make it, you can use extra coconut milk and reduce longer, but flavor will be less authentic. Leftovers taste even better the next day as flavors meld.

Dough: 300 g all-purpose flour
Dough: 1/2 tsp fine salt
Dough: 165 ml boiling water (adjust slightly as needed)

Filling: 400 g ground pork (20–30% fat preferred)
Filling: 1 tbsp light soy sauce
Filling: 1 tbsp Shaoxing wine (or dry sherry)
Filling: 1 tsp fine salt
Filling: 1 tsp sugar
Filling: 1 tsp white pepper
Filling: 1 tbsp toasted sesame oil
Filling: 1 tbsp cornstarch
Filling: 1 tbsp finely minced fresh ginger
Filling: 2 scallions, white and green parts finely chopped

Soup jelly / aspic (traditional):
  - 800–1000 ml rich pork stock made from pork bones and pork skin (see method below) — cooled and set into a firm jelly, then diced into ~1 cm cubes
OR (quick method):
  - 500 ml store-bought chicken/pork stock + 15–20 g powdered gelatin (or 3–4 sheets) — heat to dissolve gelatin, chill until set and dice into cubes

To steam:
  - Napa cabbage leaves or parchment paper rounds (to line steamer)
  - Water for steaming

Optional for serving:
  - Black vinegar
  - Fresh julienned ginger
Yield: about 30–36 dumplings (adjust ingredient amounts proportionally). Total time: roughly 3–6 hours if making traditional aspic; ~1.5–2 hours with quick gelatin.
Make the aspic (choose one method):
  Traditional pork-skin aspic: Blanch 300 g pork skin and 500 g pork bones briefly, rinse. In a large pot add bones, pork skin, 1 small onion (halved), 2 slices ginger, 1 scallion, and 1–2 tbsp Shaoxing wine. Cover with cold water, bring to a simmer and gently simmer 2.5–4 hours, skimming foam. Strain and refrigerate the stock until fully set (several hours or overnight). Once set, remove excess fat if desired and chop the jelly into ~1 cm cubes; keep chilled.
  Quick gelatin aspic: Warm 500 ml good-quality chicken or pork stock, sprinkle 15–20 g powdered gelatin (or bloom 3–4 gelatin sheets in cold water then squeeze) into the warm stock and stir until dissolved. Chill until firm, then dice into ~1 cm cubes.
Make the dough (hot-water dough):
  1. Place 300 g flour and 1/2 tsp salt in a mixing bowl. Pour 165 ml boiling water into the flour in a slow steady stream while stirring with a spatula or chopsticks until a shaggy dough forms.
  2. When cool enough to handle, knead the dough on a lightly floured surface until smooth and elastic, ~6–8 minutes. Cover with a damp towel or plastic wrap and rest 30–45 minutes (this relaxes the gluten and makes rolling easier).
Make the filling:
  1. In a bowl, combine 400 g ground pork, 1 tbsp light soy sauce, 1 tbsp Shaoxing wine, 1 tsp salt, 1 tsp sugar, 1 tsp white pepper, 1 tbsp sesame oil, 1 tbsp cornstarch, 1 tbsp minced ginger, and the chopped scallions.
  2. Mix thoroughly using one direction folding or a stand mixer on low. You want the mixture slightly tacky and cohesive — this helps hold the soup when steaming.
  3. Fold in the chilled diced aspic (soup jelly) gently until evenly distributed. Keep the filling chilled while you form wrappers.
Form wrappers and assemble dumplings:
  1. Divide dough into two portions for easier handling. Roll each portion into a long log and cut into 30–36 equal pieces (each ~15 g dough). Keep pieces covered to prevent drying.
  2. Working with one piece at a time, roll each piece into a small ball and flatten slightly. Using a rolling pin, roll each ball into a thin round wrapper about 7–8 cm (2.8–3.2 in) across, thinner in the center and slightly thicker at the edges. Aim for wrappers thin enough to be delicate but strong enough to hold soup.
  3. Place about 1 heaping teaspoon (≈10–12 g) of filling into the center of each wrapper. Try to include a piece or two of aspic in each dumpling.
  4. Pleating: With the wrapper in your non-dominant hand, use your dominant hand to make pleats around the edge, gathering the wrapper upward and rotating to form a tight sealed pouch. Traditionally 12–18 pleats are used; finish with a pinched top so the dumpling is sealed and upright. Practice will improve speed—alternatively, gather and pinch the top without formal pleats if preferred.
Steam the Xiao Long Bao:
  1. Prepare a bamboo steamer or metal steamer lined with several Napa cabbage leaves or parchment paper with small holes to prevent sticking. Lightly dust the bottom of each wrapper with a little flour if needed to avoid sticking.
  2. Arrange dumplings with space between them (they’ll expand slightly). Bring a pot of water to a vigorous boil and place the steamer over the pot (water should not touch the dumplings).
  3. Steam over high heat for 8–10 minutes (for medium-sized dumplings). Do not open the lid during the first 6–8 minutes. For very large dumplings, allow a minute or two longer. If you rested the dough longer and made the wrappers thin, err on the shorter time to prevent bursting.
  4. After steaming, remove the steamer from heat and let rest 1 minute before opening to avoid splatter.
Serve:
  1. Transfer dumplings to small plates. Serve immediately with black vinegar and julienned ginger on the side. To eat: lift a dumpling with chopsticks onto a spoon, nip a small hole to let out and sip the hot soup, then eat with the wrapper and filling.
Tips and troubleshooting:
  - Fat content: Use pork with some fat (20–30%) for a juicy filling. Too-lean pork yields less flavorful soup.
  - Aspic ratio: Ensure enough aspic so each dumpling has at least a cube or two; otherwise the dumpling won’t have much soup.
  - Wrapper thickness: Practice to make center slightly thicker than edge; too-thin can tear, too-thick makes dumpling doughy.
  - Make-ahead: Aspic can be made 1–2 days ahead; filling can be mixed and kept chilled for several hours. Assemble and steam just before serving.
  - Safety: The soup inside is very hot when steamed—allow to cool briefly and sip carefully.

8–10 lb (3.6–4.5 kg) bone-in pork shoulder (pork butt or picnic roast)
2–3 tbsp Hawaiian sea salt (or coarse sea salt), more to taste
6–10 large tī leaves or banana leaves (traditional; optional if unavailable)
2–3 tbsp liquid smoke (optional; used in modern oven/slow-cooker method to mimic imu smoke)
1–2 cups hot water or low-sodium chicken broth (for slow cooker or steam in oven)
Butcher twine
Heavy-duty aluminum foil (if not using leaves)
Optional: 1–2 tbsp brown sugar or Hawaiian cane syrup (for a touch of sweetness)
Optional: cracked black pepper or Hawaiian chili flakes to taste
Yield: Serves 10–15. Total time varies by method: traditional imu ~10–12+ hours (including pit prep and steaming), oven 6–8 hours, slow cooker 8–10 hours.
Prep the pork: Rinse and pat the pork shoulder dry. Trim excess silver skin if desired but keep a good layer of fat for moistness. Tie the roast with butcher twine into a compact shape so it cooks evenly.
Salt the pork: Rub the entire roast generously with Hawaiian sea salt (about 2–3 tablespoons total). If using optional brown sugar or pepper, rub lightly with those as well. The traditional kalua method uses only salt.
If using liquid smoke (modern method): Lightly brush or rub 2–3 tablespoons of liquid smoke over the pork to impart smoky flavor. This is optional and not used in a true imu.
Traditional imu method (authentic):
 - Prepare the imu (underground oven): Dig a pit large enough for the roast. Line the bottom with hardwood logs, build a strong fire and heat rocks in the fire for 2–3 hours until the rocks are very hot. Push the embers to the side and remove coals as needed so rocks remain hot but embers won’t burn the leaves directly.
 - Prepare leaves and wrapping: Lay down a thick layer of tī leaves or banana leaves over the hot rocks. Place the salted pork on the leaves and wrap completely with more leaves; tie with twine if needed. Cover the wrapped roast with burlap or old mats (dampened) and then cover the pit with soil to seal in heat and steam.
 - Cook in the imu: Allow the pork to steam in the sealed pit for 8–12 hours depending on roast size and heat retained in rocks. The meat is done when it is fall-apart tender and reaches an internal temperature of 195–205°F (90–96°C) and shreds easily.
 - Recover the roast: Carefully remove the soil, burlap and outer leaves (beware of hot steam). Transfer the wrapped pork to a clean surface, unwrap the leaves, and shred the meat with forks.
Oven method (home-cook alternative that mimics imu flavor):
 - Preheat oven to 325°F (160°C). Place a rack in a roasting pan.
 - Wrap the roast: If you have tī or banana leaves, wrap the salted pork in them. If not, wrap tightly in heavy-duty aluminum foil (double-wrap) to trap steam. Add 1/2–1 cup hot water or broth to the bottom of the pan to create steam. Optionally add a little liquid smoke to the meat surface before wrapping.
 - Roast low and slow: Place the wrapped roast on the rack and roast for about 6–8 hours, or until the internal temperature reaches 195–205°F (90–96°C) and the meat shreds easily.
 - Rest and shred: Remove from oven, let rest wrapped for 20–30 minutes, then unwrap and shred with two forks. Drain and reserve some cooking juices to moisten the shredded meat if needed.
Slow-cooker method (convenient):
 - Place the salted roast, meat-side down, in a slow cooker. Add 1 cup hot water or broth. Optionally brush with liquid smoke before cooking.
 - Cook on LOW for 8–10 hours or HIGH for 5–6 hours until meat shreds easily. Remove, rest briefly, then shred and mix with reserved juices.
Finishing and seasoning: Taste the shredded pork and add additional Hawaiian sea salt or a splash of reserved cooking liquid if it seems dry. Traditional kalua pig is simple—salt-forward with smoky notes—so avoid heavy seasoning if you’re aiming for authenticity.
Serving suggestions: Serve with steamed white rice and lūʻau greens, or with poi, lomi-lomi salmon, and pickled onions for a Hawaiian plate. Kalua pig is also excellent in tacos, sandwiches, or as a party centerpiece.
Storage: Refrigerate cooled pork in an airtight container for up to 4 days. Freeze for up to 3 months. Reheat gently with a splash of water or broth covered in a pan or in a 300°F (150°C) oven until warmed through.
Notes and safety: The authentic imu requires careful preparation, proper rock selection (non-explosive river rocks), and safe handling of hot materials. If you are not experienced with earth ovens, use the oven or slow-cooker methods for safety. Adjust salt amount to your taste and the cut of meat; pork shoulder retains liquid and will remain moist when cooked low and slow.